How to create a Product Bundle in Salesforce CPQ

5 min
We all are familiar with product bundling -a method in which a few products are grouped and sold as one unit- and understand that it’s used to enable sales. Some people have a misconception that it either benefits customers OR sellers. On the contrary, it can be a win-win situation for both customer and seller.

- Benefits for Customers in product bundling include:
- Sales volume increase.
- Profit margin Increase.
- Exposure to new clients.
- Improved user experience and client satisfaction.
Benefits for Seller in product bundling include:
- One platform for buying many products that they need.
- Monetary benefits as buying as a bundle costs less
Salesforce does understand that product bundling is one of the major aspects of business and shouldn’t be neglected. So they came up with a “Product Bundle” in CPQ.
- Above all, it’s worth mentioning that
- It’s available in ALL CPQ Editions.
- Products with a subscription type of Renewable/Evergreen can't be bundled.
Few terminologies one should know before creating a product bundle are:
- Parent Product: It’s the main product with which other products will be grouped. (E.g. Camera). At least one parent product is required to create a bundle.
- Sub Products: Sub-Products are the product that cannot be sold separately. (E.g. Charger, SD card, Camera cover, Tri-pod) They need to be associated with Parent Product.
- “Product Options”: It is used to group the products. This is used to associate parent product with sub-products. (E.g. associating Charger, SD card, Camera cover, Tri-pod, etc. with Camera)
- Features (Optional): It is a logically grouping of Product Options under Features. It is used to help in organizing and having better UI. It’s optional and used when needed.
E.g. of the Features for the Product Bundle of “Camera” can be “Memory”, “Storage”, “Warranty”, “Lens”, etc.
Various fields like “Min Options” and “Max Options” can be used to define restrictions for Product Option e.g. pick 2 out of 3.
- Constraints (Optional): This is used to control how the user can select Product Options together.
- Configuration attribute (Optional): This can be used to set the value of a particular field on multiple shared Product Options. With these attributes, you can modify the values of multiple Product Options within the same bundle. It provides a move dynamic way to put more information during the quote configuration. For example, if a customer chooses a product and he is from USA, these attributes can the used to set shipping charges to zero, else if customer is outside USA then apply shipping charges.

Steps to create a product bundle
- Create the parent products.
- Create Sub-Products (Optional products and their pricing).
- Create Product Features (optional) and Constraints (optional).
- Creating “Product Option”.
Create Parent Products (Lightning Mode)
- Click on the “Products” tab and click “New”. The “New Product” window will open.
- Fill in information like “Product Name”, “Product Family”, “Product Code” and enable the “Active” checkbox under “Product Information”. Let other fields be as default.

- Under “Salesforce CPQ Configuration”
- Set the following fields which define:
- Configuration Type: (Whether the configuration is required for a bundle or not.) E.g. “Required” (means that user is required to buy this product to avail the Product Bundle benefits), “Allowed”(User has options available), or “Disabled”(User have no option)
- Configuration Event (When should be Configure Products screen be shown.) E.g. “Always”(this is the only option available with the user if Configuration Type is “Required”), “Add”(to show the configuration product screen only during the initial configuration), or “Edit”( to show the configuration product screen only on subsequent configurations)
- Option Layout: (Type of layout for displaying in a bundle.)E.g “Tabs”, “Wizard”, “Section”.
- Options Selection Method: (How options under a bundle can be selected) E.g. “Click”, “Add”.

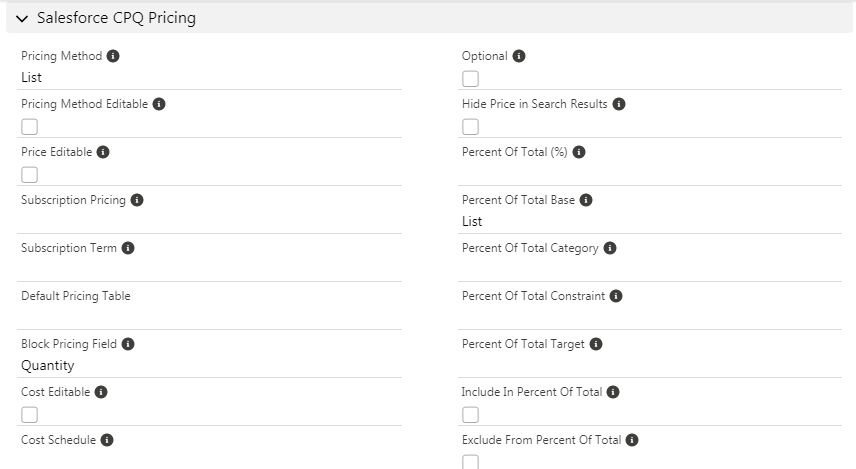
- Under “Salesforce CPQ Pricing”, select the “Pricing Method”

5. In “Salesforce CPQ Quantity Control”
- Set the following:
- Enable checkbox “Quantity Editable” if we want a user to change the quantity.
- Set “Default Quantity” as required.

- Next to “Detail”, there is the “Related” tab. Click the ”Related” tab. Under “Price Books” add value to “List Price” and enable the ”Active” checkbox.

- Click “Save” and you’re good to go.
Create the product (Classic Mode) :
Follow the first three steps as Lightning Experience and then


- Click “Save & Add Price”
- A new page comes. Enter “Standard Price” and click “New”. Redirected to the Product Detail Page.
- To add price in CPQ PriceBook, navigate to the “PriceBook” related to the product created. Click “Add to Price Book”

- Select “CPQ PriceBook” from the list. Click “Select”.
- Enter the value in “List Price” and enable the checkbox “Active”.
- Click “Save”
Create Sub-products (Optional Product and add Pricing):
These products can be bundled with other products but cannot be standalone items. All steps are the same as parent product creation just one additional point is
In Lightning mode:
- Under “Salesforce CPQ Production Selection” enable the “Component” checkbox.
- In Classic mode: Under “Product Information” enable the “Component” checkbox.

Create Product Features
Features are used to combine various Product Options with the product.
In Lightning Mode:
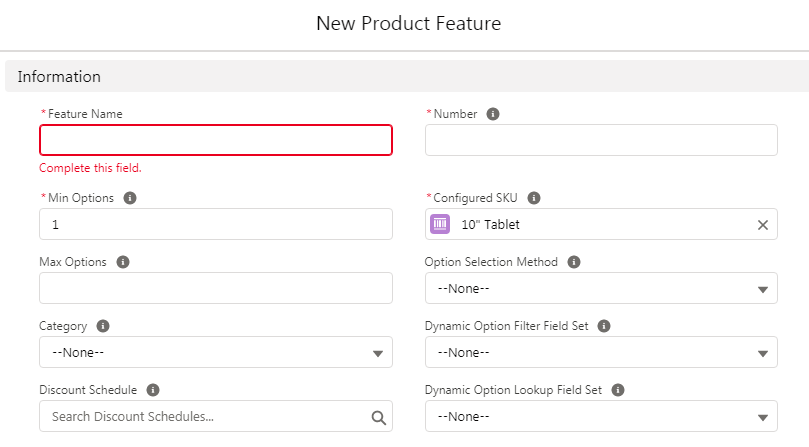
- Select the Product you will create the Feature for. Under “Related”, click for “New” in the “Features” section.
- Enter the values for fields like
”Feature Name”: Name for Feature
“Number”: Specifies the display order of the feature.
Make sure we give gaps in numbers for various features as in the future we might need to add a new feature between two existing features. E.g. we can use 5, 10, 15 as the number.
- Min Option: It defines a minimum number of this particular product that has to club with the Parent Product. E.g. with one Laptop (Parent product) at least one charger (sub-product) has to be bought.
- Max Option: It defines a maximum number of this particular product that can be clubbed with Parent Product. E.g. with one Laptop (Parent product) only one processor (sub-product) can be bought.
- Category: It’s possible to assign this feature to a particular category so that related options are grouped.
Once created, these features can be viewed under the ”Related” section of the product.


In Classic Mode:
Select the Product for which one needs to create Features. Under related list Feature click for “New Product Features”. Rest all the steps are the same as Lightning.

Create Product Options:
This is the main part of product bundling. Group products can be put together with ”Product Options”.
In Lightning Mode:
1. Select the Product you will create the Feature for. Under “Related”, click for “New” in the “Option” section.
2. Enter the values for fields like:
Configured SKU: It’s a staple thing. It’s the link between the two products that need to be bundled. It is an automatically generated field.
Feature: It’s like a folder for the product option and is like a container containing all the products that are logically grouped. That’s why it's advisable to create Features before Options so that we can easily associate them with Product Options
3.Number: Its sequence to display Options (similar to numbers in Features). It’s advisable to have a gap between the numbers of different Options.
4.Quantity: It is the default quantity for the bundle.
5. Quantity Editable: This means the Sales reps can change this quantity.
6. Min Quantity and Max Quantity: These quantities are to set boundaries for this particular product in the bundle.
7. Required: To show it’s mandatory or not for this bundle. If it is enabled then the user has to buy this product in the bundle.
8. Selector: This enabled will set the product as by default part of the bundle.

9. Bundled under the “Pricing” section: This checkbox indicates that this product is bundled with the parent product. This also means that bundled option prices are included in the bundles’ parent product price so they have fixed quantity, cannot be discounted, and have a price of zero. E.g. a charger sold with Laptop will not be charged separately as it’s included with Laptop.

10. Type: It controls the behavior of options when multiple units of the bundles are quoted. It has 3 options:
Component: E.g. if we sell 5 laptops, they will come along with the 5 corresponding chargers. So this field is used to manage the quantity of a product to the quantity of the parent product.
Accessory: quantity of this product is independent of the quantity of the parent product in the bundle. E.g One anti-virus software/ toner can go for 10 laptops.
Related Product: It’s slightly different for accessories in the respect that related product type allows the users to change quantity in the line editor. Thus making the process quicker but bypassing the validations we put in for the configurator.
11. Discount under “Pricing” section: To specify the discount percentage.
12. Discount by package: If the bundle parent has a percentage-based additional discount, sales for CPQ also apply it to the quote line generated from this product option. Discount Percentage is preferred over Discount amount when it comes to multi-currency.
13. Discount Schedule: This feature is useful when a standalone or bundle product wants a unique discount schedule for each type of sale.

Recap
Let’s recap the topics that are covered here. Firstly we looked up the benefits of product bundling for both customer and seller. Then we examined its terminologies like what is a bundle, what are “Product Options”, how do we group them logically into Features. Finally, we went into Salesforce CPQ to see how to create Products, Features, and Options and what are various fields under them.
Hope this was a useful read for you. Stay tuned for our upcoming blogs. Stay safe, stay healthy.


.jpg)


